-
Donate
Type donation amount in box below.
IMPORTANT! If you donate via PayPal using an e-mail address different than the one you are currently using on USMF and would like a 2024 Donor Icon added to your account, you MUST CONTACT vintageproductions or stratasfan and let them know what email address was used for the donation.
Thank you for supporting USMF.
Donate Sidebar by DevFuse -
Recent Posts
-

By earlymb · Posted
Worked both days of the weekend on the jeep this time. I removed the primer on the box on the right side frame horn, found the outlines of the small holes that Johan mentioned and re-drilled them: Attention then shifted to the other side. The original frame tag was long gone when dad bought the jeep, so during the first restoration we made one and pop-riveted it into place. I remember seeing the remains of the drive rivets on the inside of the box then, and they were still visible. I removed the wrong plate by drilling the modern rivets and stripped the area back to bare metal. Surely enough, the remains of the original drive rivets were clearly visible and I could easily clear the holes with a punch, no drilling required. The larger, lower holes were for the modern pop rivets and were welded shut. Next, I put on the upper bumper gusset by welding it to the horn and installing the faux rivets in the same way as on the other side (welding the into place from the underside). I also managed to get the underside of the left front horn mostly back into shape by hammering out some waves and decided it didn't need replacing anyway. As a reminder, this is what the left side looked like before we started (sorry, a bit out of focus): When this was done I decided to address the square holes in both upper gussets and the bumper (for the carriage bolts that were used there as fake rivets, even though the bumper is originally attached with 4 long bolts). After putting the bumper back temporarily and marking everything I welded the square holes back to round by basically welding it shut except the center of the hole and then re-drill to the correct size. I also welded shut the original round holes in the gussets as these would never fit. Invisible when the bumper is fitted, but I was working at it anyway and closing those holes only takes about 20 secs each. I also welded in the metal tubes that go between the upper- and lower gussets and through which the extreme left- and right bumper bolts go. The inner holes don't have this spacer, as the bumper is filled by a wooden block between the frame horns. Originally the spacer tubes are .5" (12.7 mm) outer diameter, but I found some 13 mm OD steel tubing in my magic box so that will have to do. With this the front section of the frame is basically finished. The next phase will take some time and is a dirty job, as I need to clean 30 years of old grease, dirt and other gunk from mainly the axles. engine and gearboxes to prepare it for paint. I will also replace all flexible brake hoses, inspect & clean the metal brake hoses and also the inside of the brake drum of each wheel. I started with the left front wheel as the brake was sticky, but it turned out there was no sign of fluid leaking with the rubbers in good condition; pads were good too but needed a good cleaning and sanding, as did the drum. I was out of time so next time I'll take the drum off again to check if the wheel cylinder isn't stuck. I have lots more to clean around that part of the axle anyway. Hi Ken, thanks for that and funny you mention this just now as I had a closer look at my springs this afternoon. I believe my rear packets could be the original ones with 9 leaves but the front packets are definitely post-war replacements with simple square ends to the leaves rather than the original shaped tips. -
By rd12 · Posted
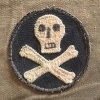
This patch came out of a post war German salesman sample book/tailor's book. All the patches I saw were bullion and in cellophane sleeves. There were about 30 in all that I saw, they had all been removed and were being sold individually. The others were all WW2 US Divisions. This looks to me like it was made from a sketch or a verbal description as is doesn't really match cloth patches from the period so not an exact copy. -
-

By SGT Wade · Posted
Hey all, I'm currently working on an 82nd Airborne Market Garden-Battle of the Bulge impression and I was wondering if they used the shrimp net style helmet net. I've not found much about that. Thanks! Wade. -

-

By TO4thIDWW2 · Posted
Thanks for the comment! Yes, finding pieces relating to the 70th Tank Battalion is not easy but I take great pleasure in collecting them. Théo -
-

By JohnK83882 · Posted
There was crazy interest in souvenirs among those who served but not in combat. Between stealing within the postal system and selling/betting stuff on the shipride home, it's amazing any vet had anything left for their cigar box. -
By TO4thIDWW2 · Posted
Welcome ! -
-
-

-

-

-

-
-

-

-

-
-
-

-

-

-

-

-

-

-

-

-

-

-

-

-

-

-
* While this forum is partially supported by our advertisers, we make no claim nor endorsement of authenticity of the products which these advertisers sell. If you have an issue with any advertiser, please take it up with them and not with the owner or staff of this forum.