-
Donate
Type donation amount in box below.
IMPORTANT! If you donate via PayPal using an e-mail address different than the one you are currently using on USMF and would like a 2024 Donor Icon added to your account, you MUST CONTACT vintageproductions or stratasfan and let them know what email address was used for the donation.
Thank you for supporting USMF.
Donate Sidebar by DevFuse -
Recent Posts
-

By AlexeiK · Posted
USN / Strike Fighter Squadron VFA-102: “VF-102 Diamondbacks 71-73”. US-made Zippo, case 1971. October 1973, VF-102 conducted air operations in the eastern Mediterranean during the Yom Kippur War. -
-

By Manu-Military · Posted
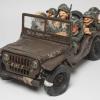
Hi all, For the first of my thirteen Jeeps, I decided that this one shouldn't be just another kit resembling all the others already seen on the internet, but rather should showcase something much more striking. So, here is the one belonging to Major General Charles H. Gerhardt, from July 1943, preserved today at the Maryland National Guard Museum. The Takom kit was assembled from the box with only a few minor refinements in the form of nuts added here and there, body reinforcements on each side of the rear backrest, real joints at the foot of the passenger seat plus a few other trinkets that I don't even remember anymore. Of course, the vehicle's specifications were scrupulously respected, making it a unique model in the Jeep fleet at the time. I can't thank enough Laurent Deneu from HISTOPIC for kindly and brilliantly creating the markings for me. Without his crucial and invaluable help, this project would never have seen the light of day. Well, I’m leaving now; I still have twelve more waiting for me, thanks for watching & greetings from the Chambois cauldron, Normandy. -
By Redleg130 · Posted
Summary - Final dimensions as 10" H, 9" W, 6" D. The two critical elements are that the two halves fall equally when opened to provide a stable base for the clock to sit when in use, and that the box hinge open without collision with the top of the clock face. There are no officially documented blueprints for the construction of an M 1 or 2 Message Center Clock box (that I could find), although several pictures are available online. One such picture was available from the IMA website, which gave outside dimensions of the box as 9" W x 4.5" D x 10" H (although these dimensions ended up not working on our example with the materials we had). The box appears to be made of oak, based on the grain pattern and has no visible fastening on the outer surfaces to indicate nails or screws. This would suggest the construction is primarily held together with wood glue, with possible pegs or wedges acting as secondary support. Given that I do not have a box to deconstruct for reverse engineering, I cannot verify the exact construction. Tongue and groove reinforcement does not seem to be likely, however, given the lack of evidence on the internal edges. When I constructed this box, I purchased readily available 3/4 inch oak boards from the local hardware store. These are listed online at Menards or Home Depot. It is not unlikely the genuine box was made from different thickness lumber, as modern dimensional lumber varies from historical dimensions due to construction conveniences (hence why a 2x4 is measured at 1.5 x 3.5). In any case, this thickness appears fairly appropriate to the pictures available. I purchased 10" wide boards, which were 9.5" dimensionally. This allowed for the correct width of the box without need for edge gluing. I Measured the clock and I had to be just under 6" (around 5 7/8 inch or so), so this left roughly 1.5 inches in the internal area if two 3/4 width boards are factored in. When placed on its backboard, the depth of the clock was just under 4 inches. This would not have worked with the dimensions available on IMA, since two board thickness would have left only 3 inches on the internal area. So I opted to go with a 6 inches of depth for the box. This left final dimensions as 10" H, 9" W, 6" D. The box front and back boards were 7 1/2 inches wide, to allow for the side pieces to run to the front, as it looks in the photos. These were overcut to around 10.5 inches, to allow cutting width of the blade when making the opening. This was also true for the side pieces, which were 6 inches wide. The angle of the box cut was approximately 30 degrees. I first attempted a 45 degree angle but the height of the box appeared odd. 30 degrees allowed a good fit between the top and bottom portions of the box. To do this correctly, I made the cut from the back ends of the side pieces, marking the start of the cut at 5 inches, and setting the saw miter to 30 degrees. Doing these cuts at the same time prevents angle ambiguity in resetting the miter, which prevents headaches in future assembly. Cut both side pieces, then partially assemble the bottom portion with both front and back. Mark the area where the bottom of the angle meets the front piece and cut the front with a 30 degree angle on the blade. You can trim the excess wood from the top before final assembly. For the back piece, since there is a hinging mechanism, the angle would impede on opening, so make a straight cut at 5 inches. This should be verified with the dry assembly as well. The bottom and top caps can then be cut based on how the pieces fit together, or roughly 7 1/2 inches W x 4 1/2 inches. Test fit these pieces together, trim as needed, and glue or screw into place the pieces. I found pre-drilling and countersinking the holes are needed, as oak is prone to splitting. For a static display box glue might work, but if this used as a transit case, screws or dowls would be needed for durability. This example will be used as a transit case thus screws were used. This introduces the holes seen in the photo, which isn't in the originals, so dowls may be an option if you want an unblemished example. The next factor to determine was construction of the backboard itself. The wood edge around the clock looked to be around 1/4 inch, so I cut a roughly 6 1/2 W x 7 1/2 H slab. This allowed me to find the center of the semicircle by placing a compass where it met around the top and both sides of the boards. I scored a line to mark the edge of the semicircle and cut the circle out with multiple cuts on the table saw, finished with a belt sander to meet the line. This could also be done on a bandsaw or scroll saw, but I wanted to get cleaner edges. I placed the clock on the centerline of the board and roughly placed it where all edges looked equal. This allowed me to mark the top hole for the screw and pre-drill. This let the clock hang so I could mark the bottom two holes when it was partially installed. The backboard can then be fixed into place within the box by drilling two holes into the bottom of the box and running screws into it. Additional support can be provided by a screw in the front of the backboard, running through the back of the box. Just make sure it is a short enough screw that it does not penetrate through the back. Stain and a layer or two of protective coating (I prefer Tung Oil), then you can install the hardware. Hardware itself is available at any hardware store, but mine came from Rockler. -
By Cobra 6 Actual · Posted
Correction, AlexeiK: the figure above was for all US military personnel on active duty. Just the US Army alone would be ~1.1 million. -
By Manu-Military · Posted
Though I definitely don't like alpine figurine, this is a stunning paint job. -
-
By Cobra 6 Actual · Posted
That would be a tough one to expand on, AlexeiK, without further information. According to Internet sources the US Army had ~2.9 million active duty troops in the mid-1950’s. Absent some explanatory documents with the lighter it would be difficult to try to proceed. -

By Allan H. · Posted
The "Aeroweapons" bar is worn on the shooting badge. The propeller and the Crew Chief bars are worn on the Driver Badge. Allan -

By Spartan19 · Posted
That's very very surprising. But like I said its part of the niech collector area. The thing about dealers at shows is unless it's German, named medals, groupings or nice uniforms most of them do not care. That and a lot of the dealers say they are buying stuff but in reality they only came to sell stuff.
-
-

-

-

-

-
-

-

-

-

-

-

-

-

-

-

-

-

-

-

-

-

-

-

-

-

-
* While this forum is partially supported by our advertisers, we make no claim nor endorsement of authenticity of the products which these advertisers sell. If you have an issue with any advertiser, please take it up with them and not with the owner or staff of this forum.